EasyPanel
Welcome
Recently I decided to reset my home server from scratch. It was a mess. I had a bunch of disparate services, some in docker, some on bare metal. It was a massive headache to manage all the reverse proxies through nginx manually. I didn’t want to do that anymore.
I decided to use EasyPanel, a server control panel that allows you to easily manage your server. It’s been mostly great but there are still a few weird quirks that I had to get used to, but first here’s how to install it.
How do I install it?
Well I’m glad you asked. Firstly read the EasyPanel docs as that’ll always be more up to date than this guide. But if you’re here, you probably want a quick rundown.
First, install docker, use the command below or follow the instructions on the Docker Docs. Oooor follow your distro’s instructions, but I’m not going to cover that here.
curl -sSL https://get.docker.com | shThen install EasyPanel
sudo docker run --rm -it \ -v /etc/easypanel:/etc/easypanel \ -v /var/run/docker.sock:/var/run/docker.sock:ro \ easypanel/easypanel setupBut how do I set a custom domain?
This is where things are a bit weird. What I’d reccomend is setting a wildcard DNS record for your domain with both pointing to your server’s IP address. Then you can set a custom domain in the EasyPanel UI
Making a wildcard DNS record
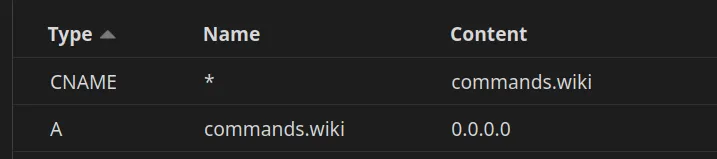
This is different for every DNS provider, but here’s how you do it with Cloudflare. First go to your domain’s DNS settings and add an A record with the name ’@’ and the value as your server’s IP address. Then add a CNAME record with the name as ’*’ and the value as your domain name. This will make it so that all subdomaind and the root domain will point to your server.
Here’s an example using the commands.wiki domain:
Setting a custom domain in EasyPanel
With your DNS records set up, you can set a custom domain in the EasyPanel UI. Go to the settings page and click on the “General” tab. Under the “Custom Domain” section, enter your custom domain and click “Save”. It might be a good idea to make sure “Serve on IP Address” is toggled on so that you can still access the EasyPanel UI if neither of the domains work, at least for now.
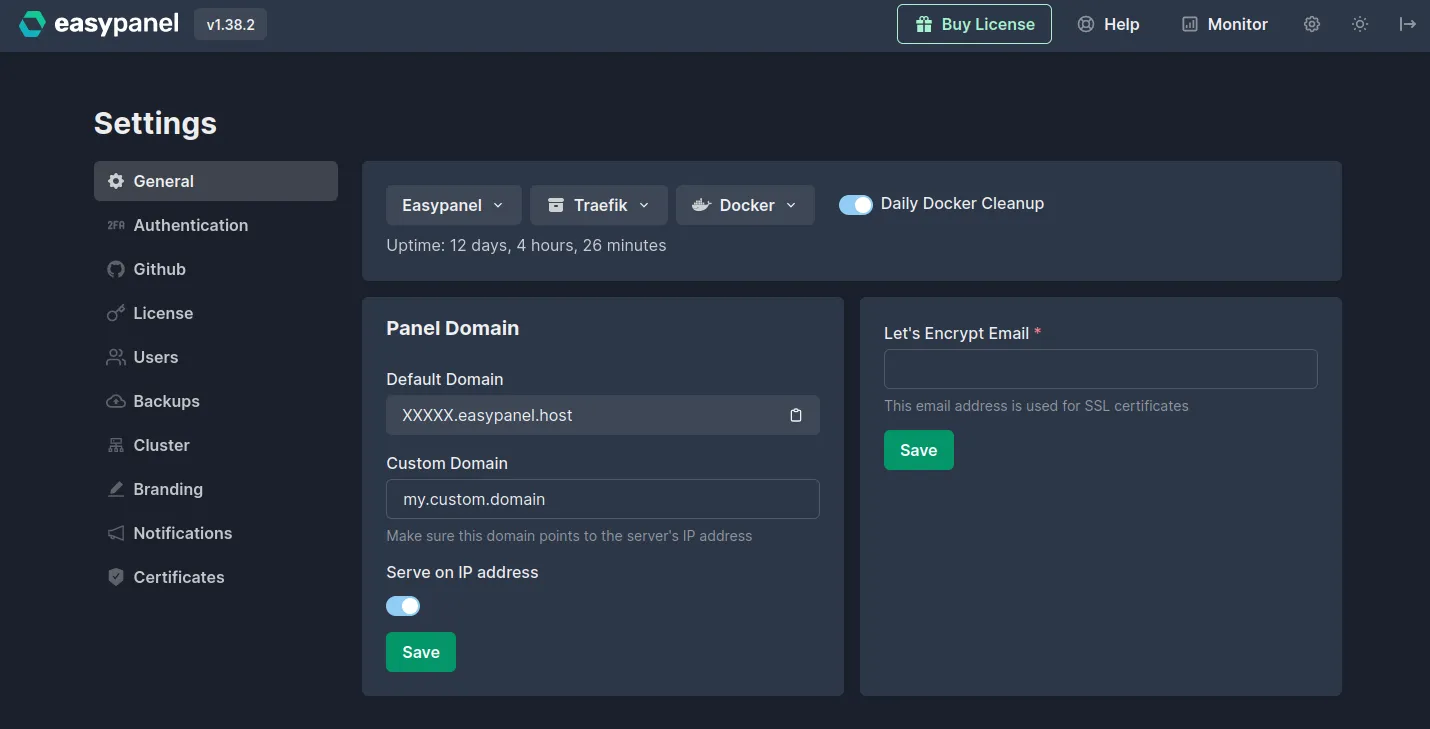 Now would be a good time to add your letsencrypt email and click “Save” again. This will allow letsencrypt to generate a certificate for your domain and send you an email if it’s about to expire.
Using my custom domain in services
Ok, you’ve got your root customdomain setup so easypanel now loads on https://customdomain.com. But what about all the other services you have running? Well, you can set a custom domain for each service in the EasyPanel UI, there are some gotchas but we’ll get to that in a bit.
Setting a custom domain for a service
We’re skipping over a little bit here. I’m going to assume you already have a project and a service in your easypanel instance. If you don’t, follow any of these Quickstarts and come back here.
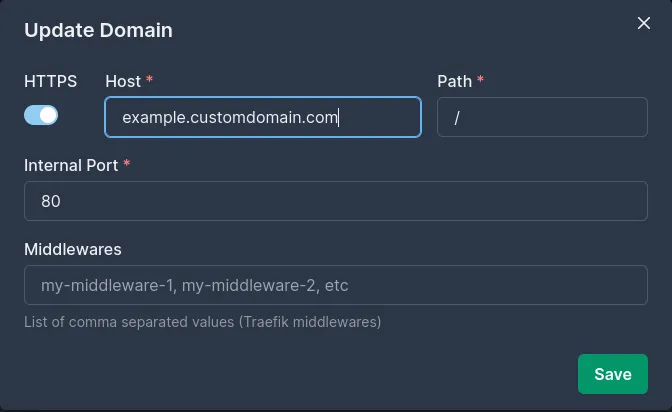
Now, go to your service in the EasyPanel UI and click on the “Domains” tab. You’ll notice that EasyPanel has already added a domain for you, it’s a subdomain of the Default Domain we saw earlier. Click “Edit” and change the “Host” a subdomain of your custom domain. For example, if you have a service called example and your custom domain is customdomain.com, you could set the host to example.customdomain.com.
Here’s an example of what that might look like:
Issues
I’ve noticed that EasyPanel doesn’t have ways to set a domain for an app everywhere, for example when you have a MariaDB database and you enable PhpMyAdmin, you can’t set a custom domain for it, EasyPanel will just autogenerate a domain based on your Default Domain. This is quite annoying and there isn’t a way around it other than adding custom traefik configuration, which is beyond the scope of this.
Boxes!
Boxes are a new type of service with EasyPanel, they allow you to set presets like PHP, WordPress etc. These allow you to have multiple services running under one container with modules that you can enable or disable. There’s one module in particular that I’ve found useful, the “IDE” module. This spawns an instance of vscode that’s running in the browser. It’s very useful but there’s no way to easily set a custom domain for it. Here’s how I did it:
- Log into your server via SSH
- Navigate to the EasyPanel/traefik/config directory
cd /etc/easypanel/traefik/config- Open the main.yaml file in your favourite text editor
nano main.yaml- Search the file until you find the section for the IDE box loadbalancer, it should look something like this:
"project-name_service-name-ide": { "loadBalancer": { "servers": [ { "url": "http://project-name_service-name:9999" } ], "passHostHeader": true }},Yes, I know this is JSON in a YAML file, this is how EasyPanel does it, don’t ask me why.
- Grab the port number from the url, we’re going to use this to set a custom domain for the IDE in the box. In this case, the port number is
9999. - Navigate to the box service in the EasyPanel UI and click on the “Domains” tab.
- Click “Add Domain” and set the host to a subdomain of your custom domain and the port to the port number you found earlier. For example, if you have a box called
wp-testand your custom domain iscustomdomain.com, you could set the host towp-test-ide.customdomain.comand the port to9999. - Click “Save” and you should now be able to access the IDE at the custom domain you set.
- Navigate to the IDE tab in the box service and copy the “Token” value.
- Manually assemble the URL to the IDE, it should look something like this:
https://wp-test-ide.customdomain.com/?easypanel-token=your-token-here- Paste the URL into your browser and you should be able to access the IDE.
Using docker-compose in Easypanel
Edit: This has changed, use the docker compose app type in easypanel instead of any third-party tools.